Monday, January 27, 2014

Our New Cheetah Chair

 The Cheetah Chair is our new
addition to our 
bedroom.


Here is our finished chair,
the following pictures are the process by 
which we re did this chair.
It originally bought it at a second hand store for $25.

We then found our fabric in a wonderful, I think, one of the best
home fabric stores ever, in Mesa, Arizona.  I think it was about $20
a yard, and we used about 2 1/2 yards for this chair.


 Original Chair


We took every thing off the chair, and brought it down to the
raw, some things needed to be glued and fixed,
but Dana did this.
I took us about 2 - 3 hours working together
to get all the staples, tacks, and fabric off the chair.

I then painted the chair.
First, I spray painted  the chair with a wonderful metallic gold paint.
Then, the next day I painted all the parts of the chair I wanted
black, with black paint and a foam brush.
I just used a small bottle of paint from Lowes,
Satin finish, some places I had to used a very small brush
so that the details of the roses and leaves on the 
chair would stand out.


We then started
(this was many months later, as the chair
sat in our bedroom looking like this for quite a while)
to add the parts back to the chair.


To put the chair completely together it took us about 3 hours.
I used the original fabric pieces that came off the chair
to be the pattern for the new fabric.

This was amazing, and I was wondering if instead of using large brass
tacks to hold the fabric down, could we just use the staple gun?
I cut the fabric for the back of the chair, and then
made piping to go around the edge of the fabric
so that we could staple in between the fabric piping.

This did work, but with the silver staples they showed brightly,
We then used a permanent felt pen to color the staples.
Then when we stapled everything on.


I love it when Dana and I work together to get a project done.
He is such a smart man, and we have been able to make some of the
most wonderful and beautiful things together.
Admittedly, I think up all this stuff,
but as I explain my ideas to him, he is able to 
figure out how to make the project work, and make it come to life!


Finished chair, 
Dana looking at his fine work.


The back of the chair has a stripe fabric on the back.

I sure love how this turned out!


And again the finished chair.

Have a great day!

Robin

Wednesday, January 15, 2014

Our $27,000 Home

Today, I have decided to start a blog
that follows the things that we
have done to our home.

In 1991 we bought our home for $27,000.
It was a mess with nothing to really love in it.
I had been going to house after house after house
for months.  My agent had to look at a house
to make sure things were ok at it, as there
had been many break-ins, and by the time
I went to look at it 
everything inside was gone.
No light fixtures, no appliances, no anything,
just walls and floors.
We pulled into the driveway 
and the driveway was full of weeds to my waist.
I really didn't know it was a driveway! until later when
I came back to look at it with Dana.
Oh, Dana is my better half, I'm Robin.
We walked through the home, it wasn't locked, and talked
about it's potential.  Then left, and I kept looking
at more homes.  

This same ugly worn out brown house kept coming into my
head.  It had been on the market for years, it was now
owned by the bank, and there had been many, many offers
on it but they never came to be.

I then went to the house and drew the floor plan on a
scratch piece of paper, looked at what could be
and started to work on a new improved floor plan.

Well, we bought the home.
We weren't sure if we were going to live in it or fix it up
and sell it.  At the time, we were renting a 4,000 sq ft
home at a killer deal, since rent was cheap, cheap, cheap
at the time, and so we didn't have to be quick.

We had a family council, and asked the kids what 
they wanted to do, fix up the house and move into it,
fix up the house and sell it then find a nicer house,
or what?

The consensus was, fix up this one,
and move into it.

Well, what a time we had,
and all the things we learned!

I will start sharing with you these fun, frustrating, and intense 
things we found after we bought our home, and 
as we started tearing out and rebuilding the each room 
into our home as we know it today.


Here it is, the house we bought,
the back side of the house.
I think we were working on the back deck 
in this photo.

Here is Dana, Josh, and Naomi.
The house was sun burnt on this side of the home,
but here is what we looked like when 
we bought our home.
Brown, simple, and in need of love.

For today,

Hugs,

Robin


Tuesday, January 7, 2014

Distressed Pilars

I decided to work on our
family room.  It seemed so dark
and I know I chose a paint color
that was just took dark for the room.

So after months of paint chips
attached to the pictures on the wall
I chose a color and started to paint.

Well, of course it was too pink, 
or it looked that way after it was on the 
walls, and there was no way it
was staying.

So back to the paint store for the shade darker, 
which turned out to be perfect.

Then on the same paint chip,
I chose the next color darker to paint
the pillars and the crown molding.
This was a great choice,
and I simply love my room again.

I decided to antique the pillars
and here is how they turned out.


I left the original darker color on the wall that has the Come follow me, 
that way I didn't have to find a way to paint around the
saying.  I painted the pillars the same color as the crown molding.
Dana built the pillars for me many, many years ago,
and I had painted them a dark grey, then I was going to faux marble
them.  Well, I never got them marbled, it was always a
thought in the wind I guess.
But I went to a web site called Secrets of Segreto,
and loved how the designers were faux painting and decorating 
the rooms they designed.  So I decided to learn
from their beautiful work and change my pillars.
Dana put molding on the pillars to create the rectangles.
I then painted them to match the new color,
then distress them.


I read blog after blog, trying to figure out how to distress
 the pillars how I wanted them.
I was a bit daunting, and intimidating, even though
I have done tons of painting over the years.
I also decided to keep the intentions of the crown molding
the original grey color, with just a touch of new paint. 


So I began.


I used Ralph Lauren glaze in sienna shade.
And I used a sea foam sponge.
This sea foam sponge has large holes in it, so it isn't quite so 
even when distressing as regular sponge.


I then put the glaze on with the sponge  LIGHTLY.
This is the look it creates, and just a light rub around the top
crown molding and even lighter on the flat section of the  pillar.


Here is my first finished pillar.  
Yea!!! I did it!


The other pillars became less intimidating,
and I got all the way around the room, 4 pillars in all.


These are the 2 pillars that stand at the bottom of our staircase.


Here it is stairs and all.


The long wall of the family room to the 
kitchen, with the finished pillar at the end of the wall.


And a close up of the finished pillar.

I made it through this project,
and oh, boy do I ever love it!

This is a great way to add depth to your room,
and to add and upgrade to your home.

Ciao,

Robin

Saturday, January 4, 2014

New Pantry Door

In our kitchen,
years ago we had new cupboard doors
specially made by a special friend of ours. 
We left them natural, and we haven't done anything
with the kitchen for years.

Designs and styles have been changing over the years, 
 and I am contemplating making some changes in the kitchen.

I finally decided to step off the cliff,
and make a change.
We had truck problems, after our truck was fixed
and ended up staying home for 4 days we had 
planned on being gone helping others.

So during this 4 days I took advantage of the time home
and work on the pantry door.  I have pinned lots of pictures
of different ideas, mostly I wanted the pantry door to stand out
from the cupboards in the kitchen. 
Dana thinks it is a sin to paint nice wood.
Sometime it is, so I have hesitated on doing anything
because I wanted it to be painted.

I went through my pins on pintrest, and I found something
very interesting about myself.  
I love white, cream, natural wood, and diamonds.
I also love ochre yellows and black.
So how do you put all of that together?

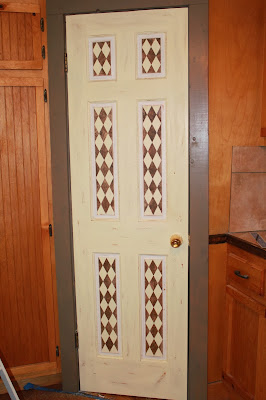
Well, here is what I ended up doing.
Enjoy.


Here is the original door


I painted inside the panels white.


I wanted a contrast of white and cream,
the rest of the door is painted cream.
I painted the insides of the panels cream as well.


I then made a pattern for the inside panels of diamonds
the pattern is the white paper taped to the bottom of the
edge of the door.  I measured and marked where my lines should
go, and drew them with a ruler.
I then taped the diamonds, I had to use an exacto
knife to get the excess tape off so all the diamonds to be
painted would show.  It was a little more work than I had
anticipated, but loved the results.


I then distressed the inside of the taped diamonds with Ralph Lauren 
sienna colored glaze.  After I pulled off all the tape, here is my result.  I decided to paint
the molding around the door the same color as my window moldings.
I also distressed the newly painted door.


I used sand paper and a very stiff bristled brush
At this point, I decided the door looked pretty bright in my
natural kitchen, so I decided to antique the entire door.


Again I used the Ralph Lauren glaze.  With a cloth
I wiped the glaze all over the door, following the grain of the wood.


Here is the finished door.  
I am in love with it.  I took a little more time than I had
anticipated, but the result made me very happy.

Distressed, antiqued, and painted.  
I will share more pictures later, as I start decorating 
for the seasons.  My seasonal wreaths will hang
here for sure.

I have more changes to go to finish the kitchen the way I want it.
This is the first of many projects.  

Until next time.

Robin